Zoeken in deze blog

woensdag 2 februari 2022

You're cracking me up!

 Goblins, elfs, evil little buggers, I don't know, but somehow when it prepared to continue wotking on the engine I npoticed a huge crack in the casing.


dammit dammit dammit...

So I had it welded by someone who know how to weld aluminum, result:


Now of we go, new shift cross installed AFTER we installed the axel and one side of the casing is done!


But wait, there is more, as someone thankfully pointed out to me, we forgot to put to bolts in place before you put in the primary insert facepalm emoji.


So out with the drive train axel, out with the primary and in go two annoying bolts. Next up placing the crankshaft, also Pinasco. We already place new oil seals and a new bearingnow it was just a matter of putting the it in the right way around (clutch but goes on the left, ignition bit goes on the right).


Notice the bolt that are now in place :)


dinsdag 1 februari 2022

Starting the tune up: shift cross

The primary gear has beem sorted so now it’s just a matter of putting all the ready made pieces in place, should be easy right! Yeah you guessed it: wrong…

First thing we did was build up the Christmas tree, so basically putting all the gears on the primary shaft, replacing the shift cross and assemble. That went ok, had a little trouble with locking washer but sorted that out also. Replaced the bearings and seals ready to receive the primary axel.


Lesson one, do not hammer the axel in place with the shift cross installed!


The axel needs quite some persuasion so while hitting it with an hammer, as one done on a piece of precision engineering, all the force was trnasferred directly onto the shiftcross, causing it to nicely snap off all four legs...

woensdag 13 oktober 2021

Starting the tune up: primary gear.

 So, all the parts are here, now it's just a matter of putting them in place. Right!? Easiepeasy, yeah.... wrong...

Let me tell you where we are at now.

In the previous posts you have seen we disemsambled the old ACMA engine, so we have an empty case that is in good nick. All the performances parts are at the ready, first step replacing the primary gear. For this we need to seperate the two protective plates that hold the primary gear and the springs in place. They are rivetted together so we need to drill out the rivets.


The new primary is from Bollag and has nice racing yellow reinforced springs (which will never be seen again!). These springs suck up part of the beating the primary gear gets when changing gears. I bought a kit to replace the gear that came with new shiny plates springs and rivets. After opening up the old gear indeed three of the old springs were broken, so replacement was necessary. 


Unfortunately the new shiny plates were too big.... so I decided to reuse the old, not so shiny, plates. But damn... those rivets are a bastard I managed to ruin the ones supplied without even getting close to attaching the plates. So the weekend was spent driving to Rijen to pick up a new set of plates and rivets. Unfortunately the plates they had were also too big but I needed the rivets antways. So inded up by the kit with plates and springs just for the rivets. Buying a 1000 rivets would actually have been cheaper!!!!

But this time with a bit more patience and slightly shorter rivets we were succesfull. New priamry with racing yellow springs is good to go!


Next step: the gears and shifting cross.


maandag 30 december 2019

Laying out the plan


Now this is going to  be a very long plan influenced by many factors, of which some are not even Vespa related.

So step one: buy the Vespa.
Checked, bought a Vespa, now that was easy.

Step two: decide on the desired project outcome.
This was also clear from the beginning, we want to end up with an original looking Vespa Faro Basso with an original running engine, mechanically sound and if possible with as much of the original paint that is still there underneath the white.
However next to that I want a fully tricked out engine that gives the old lady the much needed power to be able to handle modern day traffic.

Step three: collect all the parts.
We have all the revision parts for the original engine which we will try to get running and will then safely put away.
We have a donor engine (of which we will only use the casings and the gears).


We have all the steroid parts from Pinasco, cylinder, exhaust, gear, clutch, carburettor and ignition.
We have all the parts to compete the Vespa body, saddle, new handlebar, new logo, all the rubbers etc.
Step four: create a work space.
This one will take a bit longer, I need to finish the renovation of my house, so I can empty out the garage and the shed (filled with stuff for the house right now), then we can redo the shed to become a work place.
But, we will need a proper motorcycle lift to place the Vespa on, this is still pending. I might consider making one myself actually (to be continued).


Step four: take the Vespa apart and start doing the body work.

Step five: get the original engine running and for this I would like to have an engine mount, again a DIY project.

Step six: make the souped up steroid engine.
Step seven: assembly!

Sounds so easy, right!?
Right…..


vrijdag 20 december 2019

Convention time

Last weekend was the Central Classics Motorcycle convention in Houten. A great opportunity to see some great vehicles, scourge for unique parts and get some deals on tools. So my mate, my father and myself set of on windy Saturday morning to Houten (near Utrecht).


You always go to the conventions in the hope to find something unique and boy, did we! I know of the existence of this scooter and it had always intrigued me, but it was great to see on in real life: a Vyatka Vespa Copy! https://en.wikipedia.org/wiki/Vyatka_(motor_scooter)

I was very much tempted to buy this scooter and we were offered a great price, but… I still have the old lady waiting for some TLC, a house to renovate and some sculpts to produce, so I can’t really take on another project. The Vespa wannabe had great patina, and the engine was alive, it would have been a great quick and dirty get it back on the road ASAP kind of resto project. Some pics:


We also saw some great cafe racers (also on my to do list) and other vehicles like this calssic Guzzi scooter.


Another little gem we found was a Peugeot S57B scooter. A really lovely chain driven 125cc low rider. Still looks like a really nice base for a scooter hot-rod, but unfortunately prices are already very steep. https://en.wikipedia.org/wiki/Peugeot_Motocycles 


And in the tradition of the Vespa, the Mini, the VW Beetle and the Fiat500, also Peugeot has issued a retro look version of this scooter, the Django! Nice for the Tupperware lovers.


We also managed to pick up some crucial tank repair and treatment materials, but we didn’t find any interesting parts there. The stuff we bought will first get rid of the rust in the tank and then cover it in a good layer of fuel proof epoxy.


woensdag 18 december 2019

Partly there


So, now that the plan of approach has been made it’s time to collect all the required parts. We basically have three categories:

·      -   Replacement parts (broken or missing parts)
·      -  Upgrade parts (better than the old)
·      -  Running parts (gaskets, seals etc.)

First trip me and my mate made was to Maskes (www.maskes.nl), a big oldtimer Vespa restoration and parts company. My purpose was to source most of the running parts and get some first hand tuning advice. Running parts aren’t the most interesting to buy, they will be placed mostly out of sight and just serve a single purpose: keep the Vespa running.


Maskes is located in an old leather tannery, a beautiful old industrial building. Inside they have a huge workshop, a full floor designated for displaying Vespa gems and a floor with old parts which they collected over the years.


The owner always lets us wander about a bit, so we just took everything in. First time I came to Maskes must more than 10 years ago, but I still manage to find things that I haven’t seen in previous vists. He has a couple beautiful Faro Basso’s standing around including a Sei Giorni replica (more info on Sei Giorni her: https://www.piaggiogroup.com/en/archive/press/vespa-sei-giorni-origins-legend), and I believe at least three SS90 Vespa’s (more info here: https://silodrome.com/vespa-ss90/), or maybe even one or two of them are original…


(most of the above pictures courtesy of my friends girlfriend)

Now for the parts, we bought oil seals, gaskets gaskets and more gaskets, oil, teflon cabels and more assorted stuff. The one replacement part we bought was a legshield Vespa logo that was missing, not the original, not the best possible replica, but the cheapest one, because I still have hope I will find an original one day!
I also already bought some replacement parts. I did some more sourcing on the German Ebay and picked up a true gem there, a replacement complete ‘lenker’, otherwise known as a handle bar or a steer. This is from an original Vespa VM1T Faro Basso and was re-chromed to look absolutely new.


On the Italian Ebay I managed to find a good quality Vespa VM1T rear light, for about half of what the major shops are asking for it. The old lady has a non-standard rear light currently, which incorporates the Italian number plate, it looks nice enough but I want it back to original.


I am waiting for a huge list of upgrades parts from Maskes, basically all I need to start giving the old lady that souped up pacemaker to make that old heart pump like the heart of teenager who sees their crush walking by in the school hallway.


And I ordered a whole lot of additional running parts from an Italian web shop to have everything at the ready when we start the surgery, you don’t want to be without needle and thread when you have to start stitching things up. So more gaskets, rubber parts, springs, bolts, clamps etc.

The bill is already running up, lets just say that we are close to investing around 7000€ in this project... Oh and I have some old parts coming from Germany, suspension, cooling cowl fly wheel protector etc. Good thing I don't have a wife at the moment or I'd be dead (and the fiancĂ© is out of the country)!

dinsdag 17 december 2019

Splitting hairs


So we now have the old lady safely stowed away. And an ACMA Vespa engine ready for surgery. But why did you buy that second engine, I  hear you ask? Well that is because we are not only going to breath back life into this old lady, we are doing something else. A facelift is not the right metaphor here, it’s more like we are going to give her a souped up pacemaker, load her up on doping and get her ready to run the quarter mile at the next Olympics.

What’s that, you say, yes in short we are using the donor ACMA Vespa engine to tune it up to more than twice (close to thrice (is that even a word?)) the HP! The original VESPA engine we will keep nice and standard and tuck away somewhere dry and dark.

Now back to the surgery, long story short, so... I live with my parents... No I am not otherwise homeless, it's just that after I returned from Abu Dhabi (see post 1) I bought a house that I am still renovating. Now why is this relevant you ask, well since space is sparse in my parents house I'm performing this surgery on an area the size of an A4 sheet of paper. And yes I would like some brownie points for that.

The area I have available is a small cluttered table in the attic. Below picture shows basically what we will need to do to Vespa engine block:

First step, take off the cylinder head. This engine has it cylinder attached with three bolts opposed to all newer Vespa's that have four bolts. Unscrewing these bolts went smooth enough, quick inspection shows the head and the cylinder itself are in decent nick, no scratches, no strange discoloration, so prospects are good!


Next we take off the entire cylinder so we can inspect the piston proberly. This requires a little bit of wiggeling because you have to slide the cylinder sleeve out of the casing, but again smooth sailing. Even the piston was in great nick, no cracks or scratches (too bad it's not going te be used anymore).

On the above picture we can clearly see the two channels. I'm no expert by any means but the channels make it possible to tune this engine as opposed to one transfer port version. I believe this engine block has two channels for better release of, and intake of air. This gif shows the process.

https://qph.fs.quoracdn.net/main-qimg-f7dceb754942aa9b217dfc9868404c18

Now we started taking off the flywheel. This was little bit more cumbersome without the right tools but we managed. Actually one fin of the flywheel was already broken off probably from past attempts to remove the flywheel while blocking it with a screwdriver against the engine casing. Bloody babarians...


Now underneath the flywheel we will find the ignition plate that holds the coils, condensator and the contact points, basically everything we need to create a spark to ignite the fuel mixture in the cylinder (and generate power for the lights and horn). But, we don't or we didn't.

Two coils are missing on the statorplate which I believe are the coils that provide the power to the lights etc. But this makes the decision to upgrade from a 6v magnetic to a 12volt electrical system easy. 12 volts it will be.

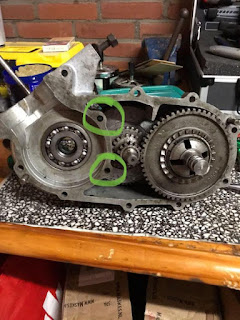
Next splitting the casings (we had to remove some other bits and bobs, clutch cover, flywheel cover etc.). I wasn't expecting this to be easy since the casings had been stuck together for quite a many year. But with some gentle wiggling and some subtle nudges with a huge hammer, it began to move.


Victory! The insides look quite ok, the gears are in good nick, no cracks in the casing and there were no pieces of metal lying around nromally indicating breakage and wear and tear. The bearings sound a bit crunchy so they will need replacement. Then the last issue arose, I couldn't get the axle out from the case. Some googeling and some advice from vespaforum.be eventually, basically led to me banging on it till it released. Voila, full split!


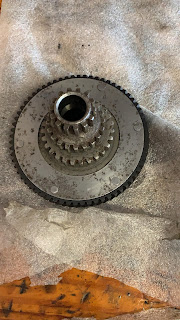
I then proceeded taking out all the inner parts, the gears and cogs used for drive train. Also i removed the gear selector and the clutch. The clutch plates were really cooked together with old oil and bad repairs (it looks like someone put some dots of silicon on the plates or something). But that will need a full replacement anyways.


Now the plan:
-Replace the standard 125 cylinder and piston with a Pinasco 160cc set (bigger combustion chamber)
-Replace the standard 19mm carburettor with a 22mm Pinasco (more fuel and air)
-Replace the 45mm cranckshaft with a 47mm (longer stroke for the longer cylinder)
-Replace the 6v ignition with a more stable 12v Flytech (more stable spark)
-Replace the clutch and a primary wheel with a Pinasco set (better traction to deal with the power increase)
-Replace the exhaust (better release of increased fumes).

I have worked on Vespa engines before, I did oils seal replacements, replaced some bearings, changed gaskets and fiddled about with cylinders and pistons, but a complete rebuild like this is new to me, but I am looking forward to it!